From Zero to Hero: DIY Gaming Room Lighting with Strip Lights
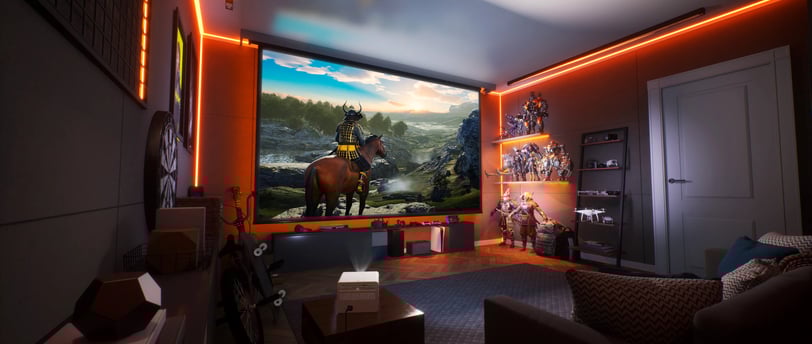
Creating an immersive gaming environment involves more than just a high-resolution screen and top-notch sound system; lighting plays a pivotal role. Proper lighting can transform a standard room into a captivating gaming haven, enhancing the overall experience. Among the popular options are LED strip lights, RGB strip lights, and neon rope lights, each offering unique benefits tailored to different preferences and needs. Let's talk in this post about how to install them in our setup!
RGB & AMBIENT LIGHTNING
7/24/20246 min read

Illuminate Your Victory: A guide to glow
Creating an immersive gaming environment involves more than just a high-resolution screen and top-notch sound system; lighting plays a pivotal role. Proper lighting can transform a standard room into a captivating gaming haven, enhancing the overall experience. Among the popular options are LED strip lights, RGB strip lights, and neon rope lights, each offering unique benefits tailored to different preferences and needs.
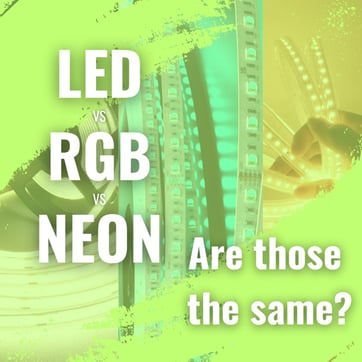
We've already explained the differences between these three types of strip lights in one of our post on Instagram and you can see it here:
In a nutshell, Neon rope lights use traditional neon gas tubes for a continuous, vibrant glow. On the other hand, LED and RGB strip lights use energy-efficient LED lights, offering more flexibility and cost-effectiveness. While both RGB strip lights and Neon ropes can change colors, LED and RGB strip lights provide a wider range of options. By thoughtfully choosing and installing the right lighting, you can significantly elevate your gaming experience, making every session more engaging and enjoyable.
By thoughtfully choosing and installing the right lighting, you can significantly elevate your gaming experience, making every session more engaging and enjoyable.
Step 1: Planning Your Lighting Layout
Creating an immersive and visually appealing gaming environment starts with careful lighting planning. Begin by measuring your gaming space to pinpoint strategic locations for your lights. The most common places where to put them are:
Behind your TV, monitor or screens
Along ceiling edges
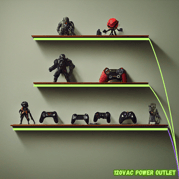
Beneath shelves
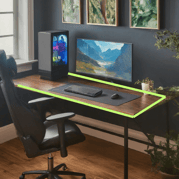
Around the furniture and desks
Next, meticulously map out the path your lights will follow. Determine the exact length of each strip and its distance from the power source. While simple for a single strip, most setups require multiple strips, necessitating careful planning for connections and corners.
A well-executed lighting plan enhances both aesthetics and gameplay. For instance, backlighting your monitor with LED strips can reduce eye strain, while under-shelf lighting creates a balanced, immersive atmosphere.
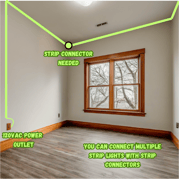
While planning your layout, it's crucial to take into account the location of power outlets. Ensure that your power sources are easily accessible and that you have enough outlets to accommodate all your lighting needs. This can prevent the inconvenience of running extension cords across the room, which can be both unsightly and a potential tripping hazard.
Lastly, aim for a cohesive design that ties all elements of your gaming room together. Balance bright and dim areas to avoid overwhelming any section. Strategically placed lighting can highlight specific features of your room, like gaming memorabilia or artwork, adding to the overall aesthetic appeal. By meticulously planning your lighting layout, you set the stage for an epic gaming room setup where both form and function are seamlessly integrated.
Step 2: Identify your power supply
Strip lights typically operate on low-voltage DC power, commonly 12V or 24V. To power these lights, you'll need a power supply unit (PSU) that converts the standard AC power from your wall outlet to the required DC voltage. The good news is that these converts come packed with the strip light so in most of the cases you do not need to purchase an extra convert during the installation.
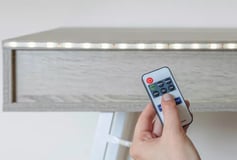
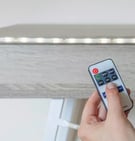
Many RGB strip lights also come with USB connectors for added convenience. You can plug these directly into the USB ports on your TV, monitor, gaming PC, or console. This means the lights will automatically turn on and off with your device, eliminating the need for a separate power supply. This is the quickest and most direct way to power your lights.
Step 3: Join multiple strip lights together (if needed)
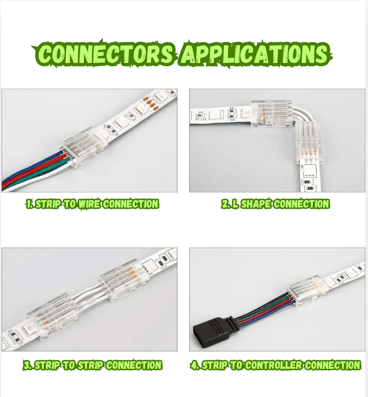
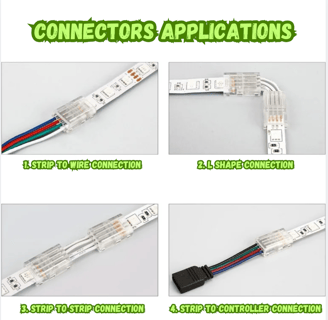
When installing strip lights throughout your room, cutting and connecting two or more strips is easy. There are two main methods: soldering or using connectors. While soldering offers a permanent bond, modern connectors are highly reliable and convenient.
When cutting an RGB strip, you’ll expose four connection points:
+12V: The shared positive power supply for all colors.
R: Red color control.
G: Green color control.
B: Blue color control.
These wires must connect correctly to maintain consistent color across the entire strip. Crucially, avoid crossing wires. RGB connectors have four pins that securely connect to the strip’s copper pads. The other end accepts wires. Match the wires to the correct pins and clamp the connector closed.
By following these steps and precautions, you can seamlessly extend your RGB lighting setup.
Step 4: Install your strip lights!
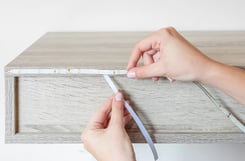
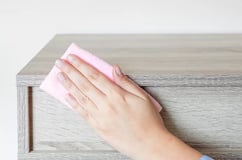
Ensure a clean, dry installation surface. Thoroughly wipe the area with a warm, soapy microfiber cloth to remove dirt and grime. For optimal adhesion, finish by using an alcohol wipe to eliminate any residual oils.
Begin the installation near the power source. Gradually peel back the adhesive backing, exposing a 6-18 inch section at a time. Align the strip carefully and press firmly onto the clean surface. Continue this process, peeling and pressing in sections, until the entire strip is securely attached.
Plug in the LED, RGB or Neon strip lights and test their functionality. All lights should illuminate correctly. Take this opportunity to verify that remote controls, app controls, or voice commands operate as expected.
Lastly, be mindful of the aesthetics. Properly conceal wires and connectors to maintain a clean look. Use cable organizers or adhesive clips to keep everything tidy. By following these steps, you can create an impressive and safe lighting setup that enhances your gaming experience (cable management is a complete separate topic that we will talk in a future post).
Step 5: It's easier if we watch an installation in a video!
The video from MS Tech shows how easy is to install strip lights on the ceiling, to connect the strips to the power supply and between them. Check it out:
Step 6: Maintenance and Troubleshooting Tips
Proper maintenance is crucial to ensure the longevity and optimal performance of your LED strip lights, RGB strip lights, and neon rope lights in your gaming room setup. Regular cleaning is essential; use a soft, dry cloth to gently wipe down the lights, removing dust and debris that could hinder their brightness. Avoid using chemical cleaners as they may damage the lights' surface and reduce their effectiveness.
Addressing common issues such as flickering or dimming lights can prevent further complications. Flickering lights often indicate a power supply issue. Ensure that the power source is stable and that all connections are secure. Dimming lights might signal a voltage drop; consider using a voltage regulator to maintain consistent power levels. If the problem persists, it may be necessary to replace the power supply or the affected light strip.
Understanding when to replace components is vital. If you notice consistent performance issues despite troubleshooting, inspect the lights for physical damage or wear. LED strip lights and neon rope lights typically have a lifespan of 50,000 hours, but this can vary based on usage and environmental conditions. Replace any damaged or significantly aged components to maintain the integrity of your lighting setup.
That's it! We have a complete blog entry about recommended strip lights that may be interesting to you, go and check it here in RUB'S. May your room glow in vibrant colors and happy gaming!

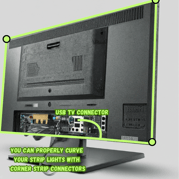
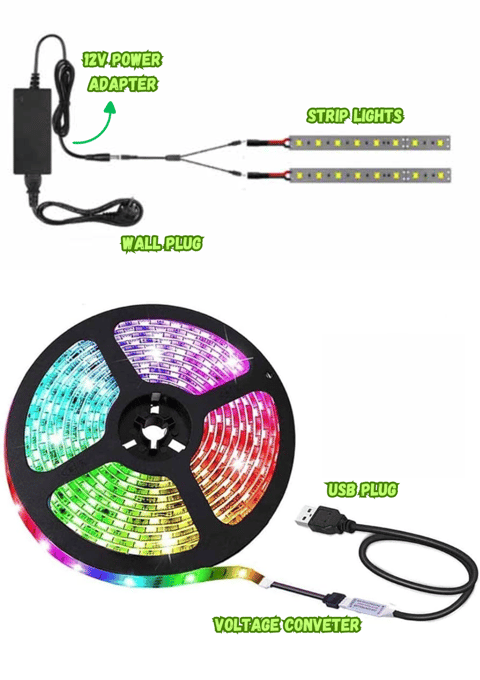

Some brands include adapters to connect the lights to both wall outlets and USB connectors. Be sure to read the product descriptions carefully or check out our recommended products.